Showing posts with label #inksmooshing. Show all posts

Monday, November 25, 2024

Welcome to my Week Growing in Unity!

 Hello friends! Welcome to my little corner of the blog-iverse! My name is Jenni Shamblin and I am the Growing in Unity Girl for this week! I have been crafting for just about as long as I can remember, so it is literally a part of me. It is my stress reliever and my safe space! I can pour myself into a project and shut out *some* of the stress if only for a little time!


I am a HUGE fan of the technique called "ink smooshing." The variety of backgrounds that can be created is endless! When I sat down to start working on my projects for the week, I just wanted to get inky! So that's what I did! I started with a couple pieces of watercolor paper that I cut to generally the size of an A2 card. I wanted to make  "winter" themed cards. I am working on broadening my card collection to include all those that celebrate during the holidays.....not just Christmas!


I grabbed some speckled egg, broken china and stormy sky distress oxides and literally smooshed each one, one at a time, onto an acrylic block then spritzed with water. I then took a piece of acetate and dabbed into the ink, then dabbed onto the panel. Over and over again until I liked the coverage. With the leftover ink on the block, I used the other watercolor paper and then a scrap of white cardstock to sop up what was left. I now have two additional backgrounds to use!

To that I then added the snowflakes from the September 2024 KOM {wander and wonder} using Versa Mark embossing ink and some silver embossing powder from Nuvo. The panel was all well and good, but just wasn't grabbing me....it needed something more. So I die cut it with one of the scallops and circles nesting dies. The white die cut panel with the washi tape was not used on a previous project and was perfect to go with this beautiful snowy piece!


I die cut the snowflake from some silver shimmer paper using a die set from Waffle Flower called Winter Crystal Die. I then glued everything together. The sentiment (also from the same KOM) was stamped with versamark ink and white embossing powder was used on it. I stapled it to the die cut piece with some blue staples. Used some foam adhesive on the entire piece and then added some flat clear sequins to give it some pop! This was 1000% influenced by Unity Design Team Member Tenia Nelson! I just love her style!

Thanks for visiting and be sure to comment for a chance to be one of two winners that will be randomly drawn at the end of my week. $20 Unity credit! Lots of great things to come!!


Saturday, September 7, 2024

~ September 2024 Friends of Unity Blog Hop ~ Color Challenge!

Here we are...September! Whew that was fast! The Friends of Unity are hopping again! This month is a color challenge! Just in time for all the fall/thanksgiving cards! 
 If you have arrived here from Jane's blog and wanted to start at the beginning.....you can click here to be taken to Crystal's blog!


Living in Florida, doesn't give much of this color pallette during the fall! I am originally from Southeastern Lower Michigan so I have experienced it in my lifetime but definitely missing the beautiful colors, crisp fall air, cider mills this time of year!


Unity Background of the Month August 2024 ...rustic foliage, stamped onto ink blended panel. 


I started with a piece of white cardstock, then blended scattered straw, wild honey, crackling campfire, walnut stain and black soot, around and around blending as I went. This is when I die cut it with the scalloped and stitched edge nesting die. The yellow got a little muddy when I went back in after I had stamped the background on. Sentiment from September 2023 harvest hues stamped in black onto kraft, die cut and mounted with foam adhesive, may arts ribbon burlap string and gina marie designs matte enamel dots.


Next is a completely different look, but similar fall colors.


Image and sentient from August 2024 KOM {thanks in all the things}. 


Started with a piece of white cardstock and stamped the image in black. Then started the coloring with Tim holtz watercolor pencils. I'm new to using these, so some of my colored parts don't really look like I had wanted, but all in all its a thumbs up!


 Spritzed some of the colors all over the panel. I then cut the colored panel with the largest rectangle from the scallops and rectangle nesting dies and then distressed it a bit with a distressing tool. I did ink blend around the edges a bit both before and after the distressing with walnut stain and some vintage photo. I added a white mat so that it popped a little more off the black background (also die cut with the largest scalloped rectangle), then added white bakers twine, clear dew drops.

Next is a card that I created using a background technique from Crystal from a few months back....double background stamping. 


The backgrounds I chose are September 2023 BOM ...off the grid and August 2024 BOM ...rustic foliage. Started with a white piece of cardstock. Stamped the grid using vintage photo. Next the fall foliage was stamped using several different oxides stamped all over to show all the colors! Crackling campfire, wild honey, vintage photo, scattered straw. After die cutting with the scalloped and stitched nesting die, I blended on some black soot along the edges. 


Typically I do not send a bunch of fall cards, so thought I would make this one a birthday card! These colors were perfect to create this monarch butterfly (from April 2020 Whit Kit grow. transform. evolve) which was stamped in black and then colored with Tombow Art Markers and some white uni-ball white gel pen and fussy cut. 


I popped up the top, but glued the bottom to the cardbase.

And last but not least, I created a card based on a card I saw on pinterest. It was an advertisement for Walmart so it did not have a name attached to it, so I cannot give credit.


When I viewed the original, it appeared to be ink smooshing in a few different colors, then a black silhouetted image on top of that. So that's what I went with! Colors are wild honey, scattered straw, walnut stain, tea dye, crackling campfire and black soot. Tree line is from December 2023 Whit Kit (radiant moonlit forest) and the sentiment is from April 2024 KOM {petal post}


This somber looking scene didn't feel like a "happy birthday" or a "happy fall," definitely feels like a sympathy card. I am very pleased with how this turned out!


This was midway through.


Thanks so much for visiting! If you've made it this far, congrats!! This was a long one! Next on the hop is Dawn!

Be sure to leave me some love, I am so thankful to hear your feedback! 

Saturday, July 6, 2024

**July 2024 Friends of Unity Blog Hop - Technique**


 Welcome to my very first post as a Friends of Unity Team Member! I am so excited to be here! This month of July is all about technique! I have learned so many cool and clever techniques over the years, it was hard to pick my absolute favorite! 

I hope to share some fun techniques and have some amazing cards when I'm finished!

One of my favorite techniques is ink smooshing. If you look back at some of my previous projects, you will see lots and lots of ink smooshing! It's a great way to create a unique background!  

I start with a piece of 65# white cardstock (can be 65# could be 110# could be watercolor paper) and an acetate sheet! Smoosh your ink onto the acetate then spritz with some water. Carefully flip it over your cardstock and gently pounce the watered down ink colors! I suggest some drying time in between colors! A heat tool will speed up the process! 


After I created the amazing panels shown above, I stamped the ...inked florals Background Stamp using versamark and white embossing powder on the first one...versafine clair and clear embossing powder on the other. I die cut both panels with the largest scallop and rectangle die and chose some ribbon. The word "hello" die cut was cut from a dark purple cardstock (and also in black on the second card), then I stamped the remaining sentiment (from ...hello fresh start). I added some staples and some clear sequin circles to add some sparkle.


I think the white embossed image is my favorite! I tried both colors to see the contrast between the two! Which is your favorite of the two?!?

This next card is also ink smooshed with a background stamp, just a different color pallet! 


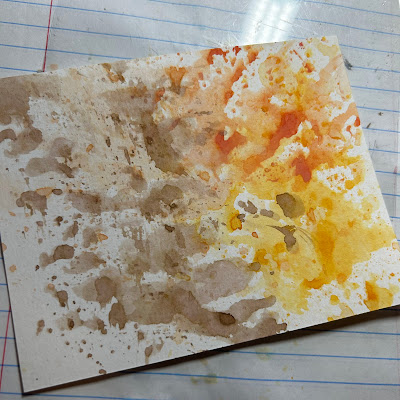
The colors I chose for this one are distress inks in wild honey, mustard seed and dried marigold. Same technique as above, smoosh, spritz, dab!! I added the May 2023 background of the month stamp called ...honeycomb chaos. Then die cut the panel with the largest scalloped and rectangle die. I tore the bottom of the panel off and distressed the edges with first vintage photo, then some black soot. 


The stamps are from the April 2020 Whit Kit Grow. Transform. Evolve. My inspiration came from Echo's example that came with the background stamp! I masked and stamped the sentiment in two different places. The banner at the top was cut with the Unity scallops and banners nesting die set. The white part at the bottom was stamped with versamark and embossed with gina k white embossing powder. There was a little bit of embossing powder over-sprinkle (LOL) so I added some embossing pen and more powder to make it a little less obvious! The bees were stamped, colored and then fussy cut and attached with foam adhesive. I wanted to try something new-ish to me and added some Hero Paste, colored with some ink, through a honeycomb die. Not too much, but just a little something on the edge.  Translucent enamel dots from Gina Marie Designs and some bakers and burlap twine finish it off! I absolutely LOVE this one! It's one of those cards you want to keep for yourself! :)


Here are my finished cards all together! Give this technique a try! You will not be disappointed! You'll get inky and messy and it will be a blast!


Thank you so much for visiting with me today! To start the blog hop from the beginning, Crystal is your girl! If you are ready for the next project, Dawn is your girl! Enjoy the hop and I'll see you next time! :)


Wednesday, May 29, 2024

Newton's Nook Designs Inky Paws Challenge #224

 Wednesday's are my current favorite day because I have the day off of my part-time job and my family is out of the house, leaving me to craft, craft, craft!


The latest challenge at Newton's Nook Designs Inky Paws is #224, which is a color challenge!
I am trying to build my NND stamps and found these two sets on eBay! Peony Blooms (cir 2018) and Simply Sentimental (cir 2014)! Both of which are no longer available! :(

 I started with my background! One of my favorite techniques is ink smooshing! Yes, that's exactly what it is!! I took colors of distress inks that matched the color challenge (worn lipstick, scattered straw and shabby shutters) and added them, individually, to an acetate sheet and added some water. I then gently tapped the color around my white cardstock until I was satisfied with the coverage. I did this with all three colors. *TIP* be sure to completely dry each color before adding another! The colors tend to blend too much if still wet. Next I die cut with the largest scalloped and rectangle nesting die from Unity Stamp Co. This is where I should have thought this through first! LOL I then took a piece of white cardstock and die cut it with a background die plate from My Creative Time called zig zag background die (which also appears to be no longer available). I separated the little pieces that made up the pattern and then realized that the border was the exact same size as my scalloped panel....I tried to line up the die cut panel with the scalloped die to get the scallops to match, but alas it wasn't exactly correct! Oh well!!  I attached the die cut zig zag panel with a zig 2 way glue pen. 


Next I stamped the peonys onto white cardstock with VersaFine Clair in nocturne. Colored with watered down versions of these distress inks and watercolored to match! While most of Newton's Nook stamps have matching die sets....this one did not come from eBay with one! :/ So fussy cutting it is!! After I cut them up I arranged them where I thought they would look best. The sentiment panel was also stamped onto white cardstock with VersaFine Clair in nocturne and then die cut with a banner die from Unity Stamp Co.  I attached the flowers and sentiment using Tombow Mono Liquid Glue to be sure it was stuck in all the little spaces between the zig zags. The last flower I added with some foam tape. I then added some clear dew drops and onto the cardbase it went!

Inspiration for this card was found on Pinterest and an old blog post from 2018 from a former DT member Naki Rager.

Unity Membership Makes Wednesday - Faith

 Wednesday's are my favorite days 1) because it's my day off, 2) because it's #UnityMembershipMakes day! I get to dig out all my fantastic Unity kits and make something magical! Unity's Show & Tell Facebook Group is a great place for inspiration!


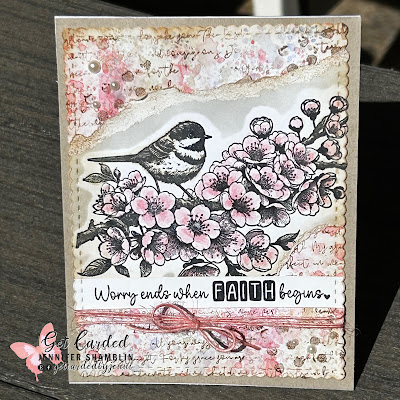
I started this lovely card with some inspiration from Unity Design Team member Echo Noble! Started with a piece of white cardstock, to it I added one of my favorite techniques...ink smooshing! It is as fun as it sounds! 


I took these three colors of distress inks (old paper, worn lipstick, shaded lilac) individually (not together) and "smooshed" them onto a sheet of acetate, added water and carefully tapped the wet ink panel all over the white cardstock until I was happy with the coverage. *TIP* Dry each layer before adding another! You could possibly "blend" too much and the colors would get muddy! After I was happy with the color saturation I stamped a Unity Background Stamp called A Faithful Letter on top using distress oxide in vintage photo. To that I added a tiny dot stamp from the May 2023 Kit of the Month called {bloom in color} using distress ink in walnut stain. Next the panel was die cut using the largest scalloped and rectangle nesting die from Unity, then ink blended around the edge. The bird is from the April 2024 Whit Kit called Bloom for New Beginnings. I stamped it onto white cardstock with VersaFine Clair in nocturne. Next I took the same three colors of ink from above and smooshed them again onto a acetate sheet, added some water and used that (along with a water brush) to water color the image!  All Unity stamps come with a white backing sheet as part of the manufacturing process. I used the white backing paper to create a mask to ink blend over the image for a nice crisp edge! Once ink blended I tore the panel as close to the image as I could, then ink blended over the torn edge to create a vintage-y look. The sentiment is also from a Kit of the Month April 2022 {true colors}. I glued this die cut panel to a piece of kraft cardstock (also from Unity) and added some pink burlap twine and pearls to finish it off!


If you are not a member of the Show & Tell page, I strongly suggest you join! Not only is there a ton of inspiration from the design team members, but everyone! Create and post away!! Never know you could inspire someone today!

Wednesday, October 25, 2023

Falling for the Holidays 2023 {BYSHC} Linky Party - Peace & Joy

 We are on day 6 of the Falling for the Holidays 2023 {BYSHC} Linky Party! Getting closer to the end!


Today is Wednesday and at Unity Show & Tell (Facebook group) that means its Unity Membership Makes day!


What you can't tell from this picture is the entire thing SPARKLES! I started with a piece of watercolor paper. I then ink blended over it using Distress Inks in evergreen bough and peacock feathers, then finished with Distress Oxides in salvaged patina, hickory smoke. Once done I sprayed some water onto an acrylic sheet. I had plans to just splatter water over it, but then decided to just smoosh the water onto the ink and see what happened! I think it looks so cool!! I splattered some watered down white acrylic paint onto that to mimic snowfall. I then stamped the background stamp, which is from the Unity Stamp Co. December 2022 Kit of the Month called {a new chapter} on to the panel using Versafine Clair in Nocturne. This is where it went in a different direction than I had planned.....I had only wanted to emboss the stars with the glitter embossing powder, but 1) I failed to "anti-static" the panel and 2) the black ink was still wet! Once the glitter embossing powder was on more places than I had intended....I just sprinkled it all over! After the embossing powder was melted I die cut the panel with the largest scalloped rectangle from the scallops and rectangle nesting die set from Unity Stamp Co. The sentiment, which was also embossed with glitter is also from a Unity kit called ...cherished holly. While it's not a subscription kit it's still a specialized kit, November 2021 Unity Sentiment Kit. Mounted the die cut panel onto a black background and it's finished! While I was thinking that it was too simple, it pretty much speaks for itself! The video of the sparkle is amazing!! :)


Thanks for visiting! Be sure to leave me some love! :)


Monday, June 5, 2023

Masculine Cards!

 Cardmakers know that masculine cards are not the easiest to come up with. No flowers, or pink, or bling.....but they still need to be made! Friends of Unity's June theme is Masculine cards! The inspiration is amazing! I will add the first stop on the hop below and you can follow along if you'd like! :) My card was also created for the June Challenge at Unity Stamp Co for Wild and Wonderful! Fish are wild in my opinion! Hope they think so too!


I started with a piece of white cardstock and stamped the Linen background from Unity Stamp Co. onto it using hickory smoke distress oxide.  I distressed the edges a little with the same hickory smoke and also black soot. I felt it needed a little color so ink smooshed some faded jeans on top. Die cut with a deckle edge die from Tim Holtz. Next I created the tag. Again, stamped (somethin' is fishy) onto white with black soot. I cut it into a tag shape and distressed the whole thing with hickory smoke and faded jeans. I was inspired to add some fishing line behind the tag from one of the ladies on the Friends of Unity hop. I always love how it looks but forget to do that extra step! Added a black background and some blue fluffy fibers to the tag. Sentiment was printed from my computer! Thanks for visiting!

Crystal starts the Friends of Unity Blog Hop! She lists everyone participating! 
Take a look!


Friday, October 21, 2022

GIU Week! TGIF!

 Well here I am on the last day of this wonderful week! To recap my week....here are day 1, day 2, day 3 or day 4 .... click on each number! If ever given the opportunity to participate in GIU, you should absolutely do this! It's so fun to challenge yourself by doing things you wouldn't normally do and getting it done quickly! LOL Unity is an amazing company and while I've not actually "met" people in person, the people I've met online are marvelous and super talented!

Now onto the actual card! LOL When I started planning my week, I hadn't planned on so many or "only" Christmas cards, but alas, here we are! LOL Let's shake it up a bit! This month's Whit Kit arrived earlier this week so let me dig into that and share what I can! The Unity kits are all kinds of fabulous! 

This month's kit doesn't disappoint! For this card I used the embossing folder (plaid company), a sheet of the paper pack and a couple of the stamps! WOW! 

Started with the kraft background, which I embossed and then gently brushed with first vintage photo distress oxide, then went back and focused on the edges with black soot distress ink. I used the scalloped & rectangle nesting dies to cut the orange panel and also the watercolor panel. The watercolor panel was ink smooshed first with several distress inks! Ripe persimmon, dried marigold and vintage photo. 


After the ink dried, I stamped the distressed wording and the large pumpkins directly on top of the ink, then die cut. I went back in with more distress inks as a pallet and a water brush and target watercolored the pumpkins, stems, leaves, etc. I added some Nuvo aqua shimmer at the top of the pumpkins and then added some white gel pen for added dimension. Added some may arts burlap string and the sentiment was added with foam tape!

Thanks for visiting and following along! I had the best week and all of your comments were read and appreciated! Please don't forget to leave some love (and your name) to be eligible to win one of 2 $20 gift credits from Unity!! Winners will be chosen at random sometime tomorrow! Thanks again until next time! :)

Jenni

p.s. edited to update.....when your 7 mo old puppy gets on the counter and eats part of your card......embellish, embellish, embellish! She not only ate the corner of my image, but also the twine that was tied as well! luckily the bows were included in the Whit Kit and covered exactly! 


Saturday, October 15, 2022

{BYSHC} Sketch Challenge 27

 Hello and Happy FRIDAY! {BYSHC} newest sketch is #27....why am I so excited? Well because this card inspired the sketch challenge this month!!! How cool is that?!?  The best part is that it was super easy!  Here's how it happened!


This is my ink smooshed panel. I used a scrap piece of watercolor paper. Added some distress inks (evergreen bough, shabby shutters and forest moss) to an acrylic block (used for stamps) and added water! The ink moves around and blends as it's reacting to the water. The colors could be added one at a time and dried in between to make them less blended. But there is just about no way to mess it up!

I stamped the holly and sentiment from theUnity Stamp Co. Cherished Holly Sentiment kit. The holly went right on top of the ink smooshing. I then die cut with the smallest scalloped die from the Scallop and rectangle nesting dies from Unity. The other papers were literally scraps laying on the desk that just happened to go together. I tied a bit of May Arts Twine around the sentiment for a little interest.

The BYSHCardmakers invite you to join us for the Falling for the Holidays 2022 Linky Party! The fun starts in just 7 days (October 21) and runs through the 28th. Check out the {BYSHC} Blog (link above) for more details!

Thanks for visiting! Please leave me some love to let me know you were here! :)

Friday, September 23, 2022

{BYSHC} Sketch 26 Challenge (card 2)

 Hello again! My second card for the {BYSHC} Sketch 26 challenge turned out better than what I had in my head! 

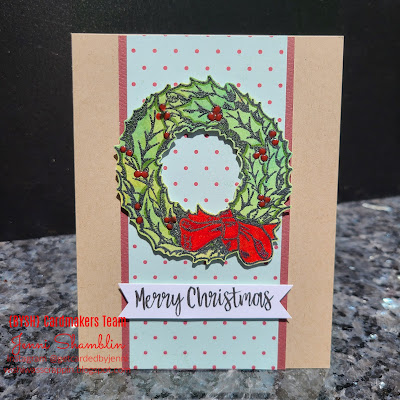
The stamp set for the wreath is by Unity Stamp Co. Graciellie Designs Cheery Christmas. First I ink smooshed a watercolor panel with some distress inks (evergreen bough, shabby shutters and forest moss....see my previous post). I stamped the wreath with versafine clair in Nocturne and embossed with clear embossing powder.  Fussy cut it out (so satisfying and somewhat therapeutic to fussy cut)! To add some depth to the leaves, I added some darker shades throughout with my Tombow Art Markers (which I also used to color the bow). I used the Nuvo Vintage Drops in Postbox Red to make the berries. The sentiment was leftover from a digital page I printed....it's from Angie Blom Digital Designs, called Hey Santa. I never throw anything away! Started with a kraft card panel, added the red and polka dot papers (from MME I believe collection circa 2010) cut per the sketch and then popped the wreath and sentiment up with foam tape.


my ink smooshed panel!

Thanks for visiting! Be sure to follow {BYSHC} on facebook and the blog!

Wednesday, September 14, 2022

Happy Birthday!

 I'm on somewhat of a roll here! I always need birthday cards, whether for my daughter's friends, my family, my friends....anybody! I created this by ink smooshing over an embossed image! The results are always amazing!


I started with a white cardstock panel, just plain ole 65 lb. I stamped the background stamp (from Unity Stamp Co., called Inked Florals) using VersaMark ink. Applied Gina K. Designs Embossing Powder in white over the top. Let the embossing powder do it's thing! Now the smooshing magic happens! I added some distress inks...one at a time....to an acrylic/plastic sheet, spritzed with water and applied it where I wanted the colors. Drying in between colors helps to keep them from running together. Watercolor paper may have been a better choice, but alas I'm out!  I used four different colors until I got the results I liked. After it was dry, I die cut it using the largest scallop die from Unity Stamp Co., scallops and rectangles nesting die set. This is easily my most used die set! I die cut the "birthday" background from a piece of scrap that matched using Unity Stamp Co., say it big die set. I cut 2 white and one glitter of the letters. It makes the sentiment pop off the page! Stamped "happy" from another set, blocked off the birthday part and only used the happy. VersaMark and white embossing powder again. I was considering adding jewels, but I think the background speaks for itself and didn't need anything extra!


These are the four colors I used.....started with lightest, then moved on from there.


Ink smooshing is one of my favorite techniques! It's so impactful and wow! Makes the backgrounds more of a focal piece rather than just a background! :)

Give it a try! Thanks for visiting, let me know you were here! :)


{BYSHC} Sketch #53 - Warm Winter Wishes

Hello again friends! As I clean up all the Christmas decorations, I like to take a minute and check out the cards that have been sent. Some ...